Your Frequently Asked Questions Answered
- Scheduling a Meeting
- Getting Students & Others into Class Zoom Meetings
- Student Engagement and Interaction
- Breakout Rooms for Class Discussions
- Recording Meetings
Scheduling a Meeting
Q: How can I schedule a Zoom meeting from Moodle?
A: Please see this page for instructions on getting started.
Main things to set when scheduling a meeting:
- Date, Time & Duration
- Recurring meeting options (if you want to set it up for the whole semester)
- Enable “Join before host”, if you want students to be able to join before you or without you.
- All other settings should stay as-is!
Once scheduled, students will simply click the Zoom link in Moodle and be able to join your meeting.
Q: How can I schedule a meeting with one student, or a small group of students, for advising or Office Hours?
A: Zoom meetings in Moodle cannot be restricted to certain students, but if you are meeting with students in your class it may still make sense to add the meeting in Moodle. You can name the meeting topic “Office Hours”, or “Meeting with Susan and Bob on Date / Time” and just make sure the students are clear on the meeting schedule.
For meetings with students not in your classes, or a mix, you can schedule a Recurring Meeting with No Fixed Time, by visiting https://amherstcollege.zoom.us. You can share this link (which lasts for a year) with students as a URL in Moodle, send it through email, or add it to a Google Calendar invitation. You can create more than one for different purposes, e.g. different classes if you prefer to hold separate office hours.
Enabling the “Waiting Room” option will let you control which students enter a meeting, and when.
Some faculty are using Google Appointment Slots for scheduling Office Hours meetings, which can be used in combination with a Zoom Recurring Meeting with No Fixed Time; detailed instructions are provided here. Others are reporting success with Calendly, which also lets students sign up for slots and integrates with Zoom.
Q: Can students schedule their own Zoom meetings for small group work?
A: Yes, students who would like to host such meetings can set up an account at https://amherstcollege.zoom.us . After they sign in they should check their profile; the User Type should be “Licensed”, but if it’s “Basic”, they should contact AskIT@amherst.edu to request an upgrade. After that, they can hold meetings without limitation.
Q: I scheduled a class meeting in the Zoom application (or the Zoom Web site), but I don’t see it in Moodle. How do I fix this?
A: Only if a meeting is created within a Moodle course’s Zoom tool will it automatically be associated with the course. But if you created a meeting with one of these other two options, you can import it into the course rather than recreate it. Copy the meeting’s ID (e.g. 123-456-789), then in the Moodle Zoom tool click on the ⋮ menu in the upper right corner, and select Import meeting. Paste in the meeting ID and click the button Import. The meeting will now be visible to you and your students.
Getting Students & Others into Class Zoom Meetings
Q: Do I need to invite students to the Zoom meeting in Moodle?
A: You do not. The beauty of using Zoom inside Moodle is that any student in your class can join the meeting just by clicking the link in Moodle. It’s still a good idea to send them email reminders in the first week or two (see below).
Q: If I schedule Zoom meetings in Moodle, will students get an email notification?
A: The students don't get a notification of any kind from Zoom, so send a class announcement telling students about the meeting, and directing them to use the Zoom link in the Moodle site. Important: please also ask students to go to https://zoom.us/test and complete this test before class.
Q: How can I invite someone to a class Zoom meeting who is not in my Moodle course?
A: If a student does not yet have Moodle access, or you have an outside visitor who needs to join your class meeting, faculty can easily forward the Zoom invitation to them. Amherst students should also request temporary Moodle access through Workday, which can be added the same day.
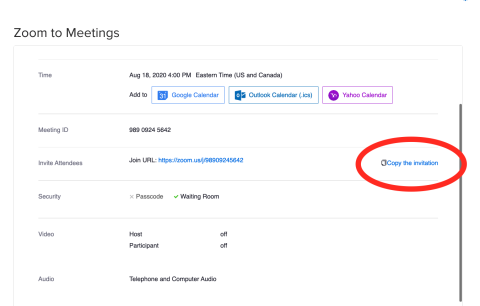
In the list of Zoom meetings in Moodle, click the name of the meeting.

On the next screen look for the “Invite attendees” section, and click the “Copy the invitation” link. Copy the invitation info, and paste it into an email to whoever needs to join the meeting.
Q: How can I prevent outsiders from joining my Zoom meeting?
A: By default, your Zoom meetings should have an obscure meeting ID and a passcode. If you only share that information with your students (through Moodle or via e-mail), the only way for an unknown participant to join is if one of your students shares this information with someone else. A best practice is to inform them your course policy is that they should not share it without your permission.
If you have turned off the setting Require a passcode when scheduling new meetings, it’s advisable to turn it back on just in case someone guesses the meeting ID.
In the unlikely event that someone shows up who you don’t recognize, you can remove them by clicking on the button Participants, pointing at their name in the list, clicking on the menu More ˅, and selecting Remove (or Put on hold if you want to investigate who they are). Additionally, you can click the Security button and select Enable Waiting Room for any subsequent participants, or Lock Meeting to prevent them if you’re certain everyone is attending.
Student Engagement and Interaction
Q: How can I present information or share my screen with students?
A: Zoom will let you display other applications that are running on your computer, by clicking on the green button Share Screen. You can then choose from:
- Desktop (on Macs) or Screen (on Windows) to share everything that you are displaying;
- Particular application windows, e.g. a PowerPoint presentation, or videos (check on the box to Share computer sound);
- A Whiteboard on which you can write with annotation tools such as shape drawing, highlighting, and erasing (learn more here);
- The screen of an iPhone or iPad (best results via a connected cable).
Click the red button Stop Share to return to the participants view, and the button Pause Share if you want to make quick changes without them being shown to your audience.
Q: How can students respond to your presentation without interruption?
A: Zoom has a Chat feature that allows students to type in short messages, including questions they have while you’re presenting, directly to everyone or to an individual. Visit this page to learn how to:
- Monitor the chat during a Zoom meeting
- Manage notifications
- Save chat messages in a text file
You can set Zoom to automatically save chats (in Documents/Zoom/Date_Time_MeetingName_MeetingID ) as follows:
- Sign in to the Zoom Web site https://amherstcollege.zoom.us .
- In the left-side list, click Settings.
- In the middle section, click on the tab Meeting.
- Scroll down to the section In Meeting (Basic).
- Click on the button Auto saving chats; it should turn blue when enabled.
Q: How can students share their own screens during a Zoom meeting?
A: You must enable Screen Sharing for your participants/students. Click on the Security button and select Allow Participants to: Share screen.
Only one person can share their screen at a time. When students do start to share, you’ll see a small green banner at the top of the screen indicating who is sharing. You can stop them at any time by clicking on the menu View Options and selecting Stop Participant Sharing.
Q: How can I view both my students and my presentation at once?

You must turn on this feature in Zoom’s ⚙️ Settings (Preferences): on the General page, look for the checkbox to Use dual monitors in the first few items.
Be aware that if you are using PowerPoint it will by default fill both screens and block the gallery! To avoid this, the settings for each presentation must be adjusted by menuing Slide Show > Set Up Show… and in the section Show Type choosing Browsed by an Individual (windowed). You can then put it into full-screen using the controls in the window’s header (Mac:
Q: How can I review student presence in my Zoom meetings?
A: In large classes, it can be difficult to be aware of which students are present. Zoom lets you review meeting participants for the previous 30 days. Refer to this quick guide on Accessing Participant Data from Zoom Meetings
Q: How can I enable a live transcription during a Zoom meeting?
A: Zoom has a built-in live transcription option that is available for licensed AC Zoom accounts holders for hosting meetings. This feature is turned on by default for all users, but must be enabled by the host or co-host at the start of any session in which it is desired (the setting does not carry over from previous Zoom sessions). Learn how to enable and use the live transcriptions feature.
Breakout Rooms for Class Discussions
Q: How can I arrange for students to have their own small-group discussions during a Zoom meeting?
A: Zoom has a feature called breakout rooms that lets you assign students to separate “rooms” where they can have small-group discussions and engage in collaborative work. Refer to these step-by-step instructions for how to create and manage breakout rooms.
Q: How can I assign students to breakout rooms?
A: When creating breakout rooms, you may assign participants manually to specific rooms, let Zoom assign them automatically, or let students choose their room (Zoom app version 5.3 required). You can also pre-assign students to breakout rooms, though this method is more involved. There are also a few other options available for controlling breakout rooms.
Q: How can I move participants between breakout rooms, or reassign them during the meeting?
A: When breakout rooms are in session, point at a participant’s name and a "Move to" button will appear, allowing you to reassign them manually. If you created the breakout rooms with the "let participants choose" setting, students can switch rooms themselves. You can also close the breakout rooms and re-create them with new automatic assignments.
Q: Can I send a message to all breakout rooms at once?
A: The host can broadcast a message to all breakout rooms to share information with all participants. Click Breakout Rooms in the meeting controls. Click Broadcast a message to all, enter your message, and click Broadcast. The message will now appear for all participants in Breakout Rooms”.
Recording Meetings
Q: How can I start / pause / stop a recording of a Zoom meeting?
A: Refer to these step-by-step guidelines to record your zoom meeting on your local device. Note that Amherst does not have Cloud Recording enabled, so you will use the Local Recording option.
Q: How do I access the recorded file from a Zoom meeting?
A: Zoom recordings are stored in the folder Documents / Zoom, in a folder whose name includes the date and time of recording. Here are the step-by-step guidelines from Zoom for how to access the locally recorded files.
Be sure to use the video file ending in MP4 (ie zoom01.mp4) and not the file ending in M3U (which will not play on many devices).
Q: After recording a Zoom meeting, what’s the best way to share the recorded file with my students?
A: Faculty can also upload videos to Moodle using our new Kaltura Video platform, which has no size limit for videos, as well as other useful features. The video file can also be added to Moodle as a file resource if it is under 400MB in size.
Q: Can students use Zoom to record my presentations?
A: Students cannot record a Zoom meeting without instructor permission. If this is desired, you can locate a designee in the Participants list, point your cursor at them, then click on the button More > that appears next to their name, and select Allow Record. Alternatively, a teaching assistant can be made an Alternative Host when creating or editing a meeting, and they can then be tasked with routine recordings (but they must set up a Zoom account first at https://amherstcollege.zoom.us ).
Be aware that students can use other applications such as QuickTime to record whatever appears on their computer screens. You may want to remind them of the College’s policy banning unauthorized recording in classrooms. The prohibition extends to recordings of virtual classes, including those conducted via Zoom and other technologies. The Student Code of Conduct under section 2.22 outlines the policy.
Q: Can I record students when they are in breakout room discussions?
A: Breakout rooms are essentially separate meetings, and by yourself you cannot record all of them, only when you are dropping in on them. So if you want a complete recording, you’ll have to assign recording privileges to participants to capture them, perhaps a designee within each breakout group as described in the previous answer. Be aware that recording privileges don’t go away when participants return to the main meeting, so you may want to withdraw this privilege before closing the breakout rooms. Also, you will not have your own copy of these videos and will need to provide a means to collect them, e.g. a Moodle forum or a shared Google Drive.
Related Resources
- Zoom Help Center
- Zoom Videoconferencing - Amherst College IT guide to logging in and suggested settings
- Zoom Accessibility: Keyboard Shortcuts - Amherst College IT Resource
- Simple Tips for Better Zoom Teaching - Student article in The Amherst Student