Additional Resource: Zoom for Teaching and Learning FAQ
Add Zoom Meetings to Your Moodle Site
1. Add a Zoom activity to Moodle
You only need one Zoom link per course, which will open the list of meetings you have scheduled (multiple Zoom links will all just direct to the same list).
- Turn Editing On.
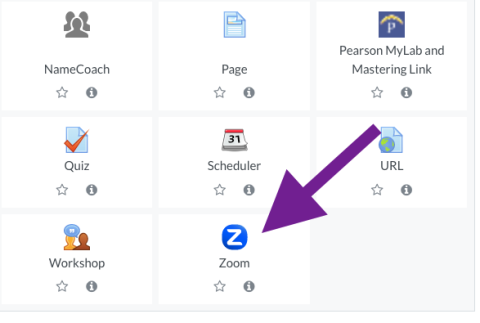
- Click the "Add an Activity" menu in the top-most section.Image

- Select Zoom.Image
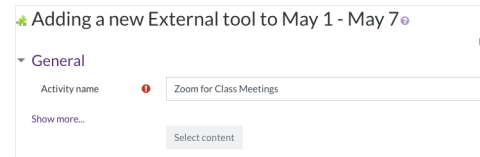
- Name it as you like, and click Save and return to course. Follow the next steps to actually schedule your meetings.Image
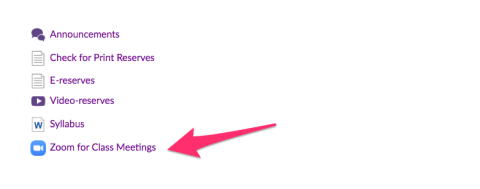
2. Click the "Zoom" link in Moodle.
Image
3. Create Your Zoom Account (if prompted).
If you haven't used Zoom at Amherst before, you will be prompted to check your email. In the email message, click "Activate Your Zoom Account".

If you get an error message on this screen, visit amherstcollege.zoom.us and log in. Follow the prompts to switch your account to be affiliated with Amherst.
Back in Moodle, simply refresh the page, or click elsewhere and back into the Zoom meeting.
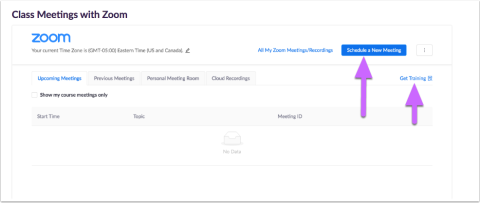
4. Schedule a Zoom Meeting
Within the Zoom area, click the "Schedule a New Meeting" button. Training videos are available with the "Get Training" link.
Main things to set when scheduling a meeting:
- Date, Time & Duration
- If you are currently outside the EST time zone, double check that the meeting time and time zone is EST.
- Recurring meeting options (if you want to set it up for the whole semester)
- Some faculty have found it convenient to set the meeting to "recurring with no fixed time", which gives a single, persistent Zoom link for the course.
- Enable “Join before host”, if you want students to be able to join before you or without you.
- Password, for enhanced security. You will not need to tell students the password if they join through Moodle.
5. Start the Meeting
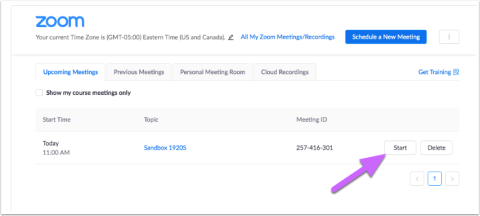
You can start a meeting immediately after scheduling if needed.
Recording a Meeting
You may want to record the meeting and upload the video to Moodle for students who weren't able to attend. Note that "Cloud Recording" is not enabled so please disregard that tab in the Zoom interface.
Additional Meeting Options
Log in at amherstcollege.zoom.us and click Settings to enable additional meeting options like Breakout Rooms and File Transfers. Once enabled in your account, they will be available whenever you start a meeting through Moodle.
Advice for Students
- To enter the web meeting, simply click the link in Moodle and click "Join" for the scheduled meeting.
- Test beforehand (do not have first class be the first time you try Zoom!)
- Use earbuds or headphones with mic if possible.
- Mute your mic when not speaking, especially if typing!